Using Pachyderm to Create a Batch Inferencing Pipeline#
In this guide, we’ll help you create a simple batch inferencing project in Pachyderm, train your model using a Determined cluster, and then use the model in an inferencing pipeline.
Note
Inference describes the process of making predictions with a trained model. Specifically, when you input new data into a model to obtain predictions, you are performing inference.
Objectives#
After completing the steps in this tutorial, you will have a a fully-built batch inferencing pipeline with results and you will understand how to leverage Pachyderm when working with your Determined cluster.
By following these instructions, you will:
Install Determined and Pachyderm locally.
Create a batch inferencing project and train a model.
Bring a downloaded checkpoint from Determined into Pachyderm.
Create pipelines for training the data, inferencing, and collecting the results.
Prerequisites#
The following prerequisites are required:
Docker with Kubernetes enabled
A running Determined cluster
Pachyderm installed
Note
To set up Determined locally, visit the quick installation instructions: Quick Installation
To set up Pachyderm locally, visit First-Time Setup or Pachyderm Local Deployment Guide
Get the Tutorial Files#
Before starting this tutorial, ensure you have copied the
determined-pachyderm-batch-inferencingfiles from the Pachyderm examples repository to your local directory.
Note
The tutorial files include the experiment configuration file, the files needed to create each pipeline, as well as the data needed to train the model.
Verify Your Installation of Determined and Pachyderm#
Verify you have installed the latest version of both products.
Run the following command to verify your installation of Determined:
det version
You should see a configuration summary with details like the version number, master address, and more.
Run the following command to verify your installation of Pachyderm:
pachctl version
You should see a configuration summary the displays the versions for pachctl and
pachd.
Create a Project in Pachyderm for Batch Inferencing#
To begin, you’ll need a project to group together all your training and inference repositories (repos) and pipelines. To do this, you’ll create a new project in Pachyderm.
Run the following command to create a new project:
pachctl create project batch-inference-1
Next, update your Pachyderm configuration to set the context to the project you’ve just created:
pachctl config update context --project batch-inference-1
By setting up a dedicated project, you ensure that all related repos and pipelines are organized cohesively. This encapsulation makes it easier to manage batch inferencing workflows in the future.
You are now ready to create a project repo.
Create Repos in Pachyderm for Training Data#
To manage our training data effectively, we’ll first need to create repos for storing the data. We’ll use a typical 80:20 train/test split.
To create the train/test repos, run the following commands:
pachctl create repo test
pachctl create repo train
pachctl list repo
The expected output should be something like this:
PROJECT |
NAME |
CREATED |
SIZE (MASTER) |
DESCRIPTION |
|---|---|---|---|---|
batch-inference-1 |
train |
3 seconds ago |
≤ 0B |
|
batch-inference-1 |
test |
6 seconds ago |
≤ 0B |
To see the repos in the Pachyderm UI, visit localhost in your browser and then select
batch-inference-1 to view the project.
Create a Pipeline for Training Data#
Before we add data to our train and test repos, we’ll need to create a pipeline. This pipeline will merge the data from the train and test repos, then compress them into a tar file. This provides easy data access and also serves as a convenient checkpoint for data cleanup or transformations.
Run the following commands to create the pipeline:
pachctl create pipeline -f ./pachyderm/pipelines/compress/compress.json
pachctl list pipeline
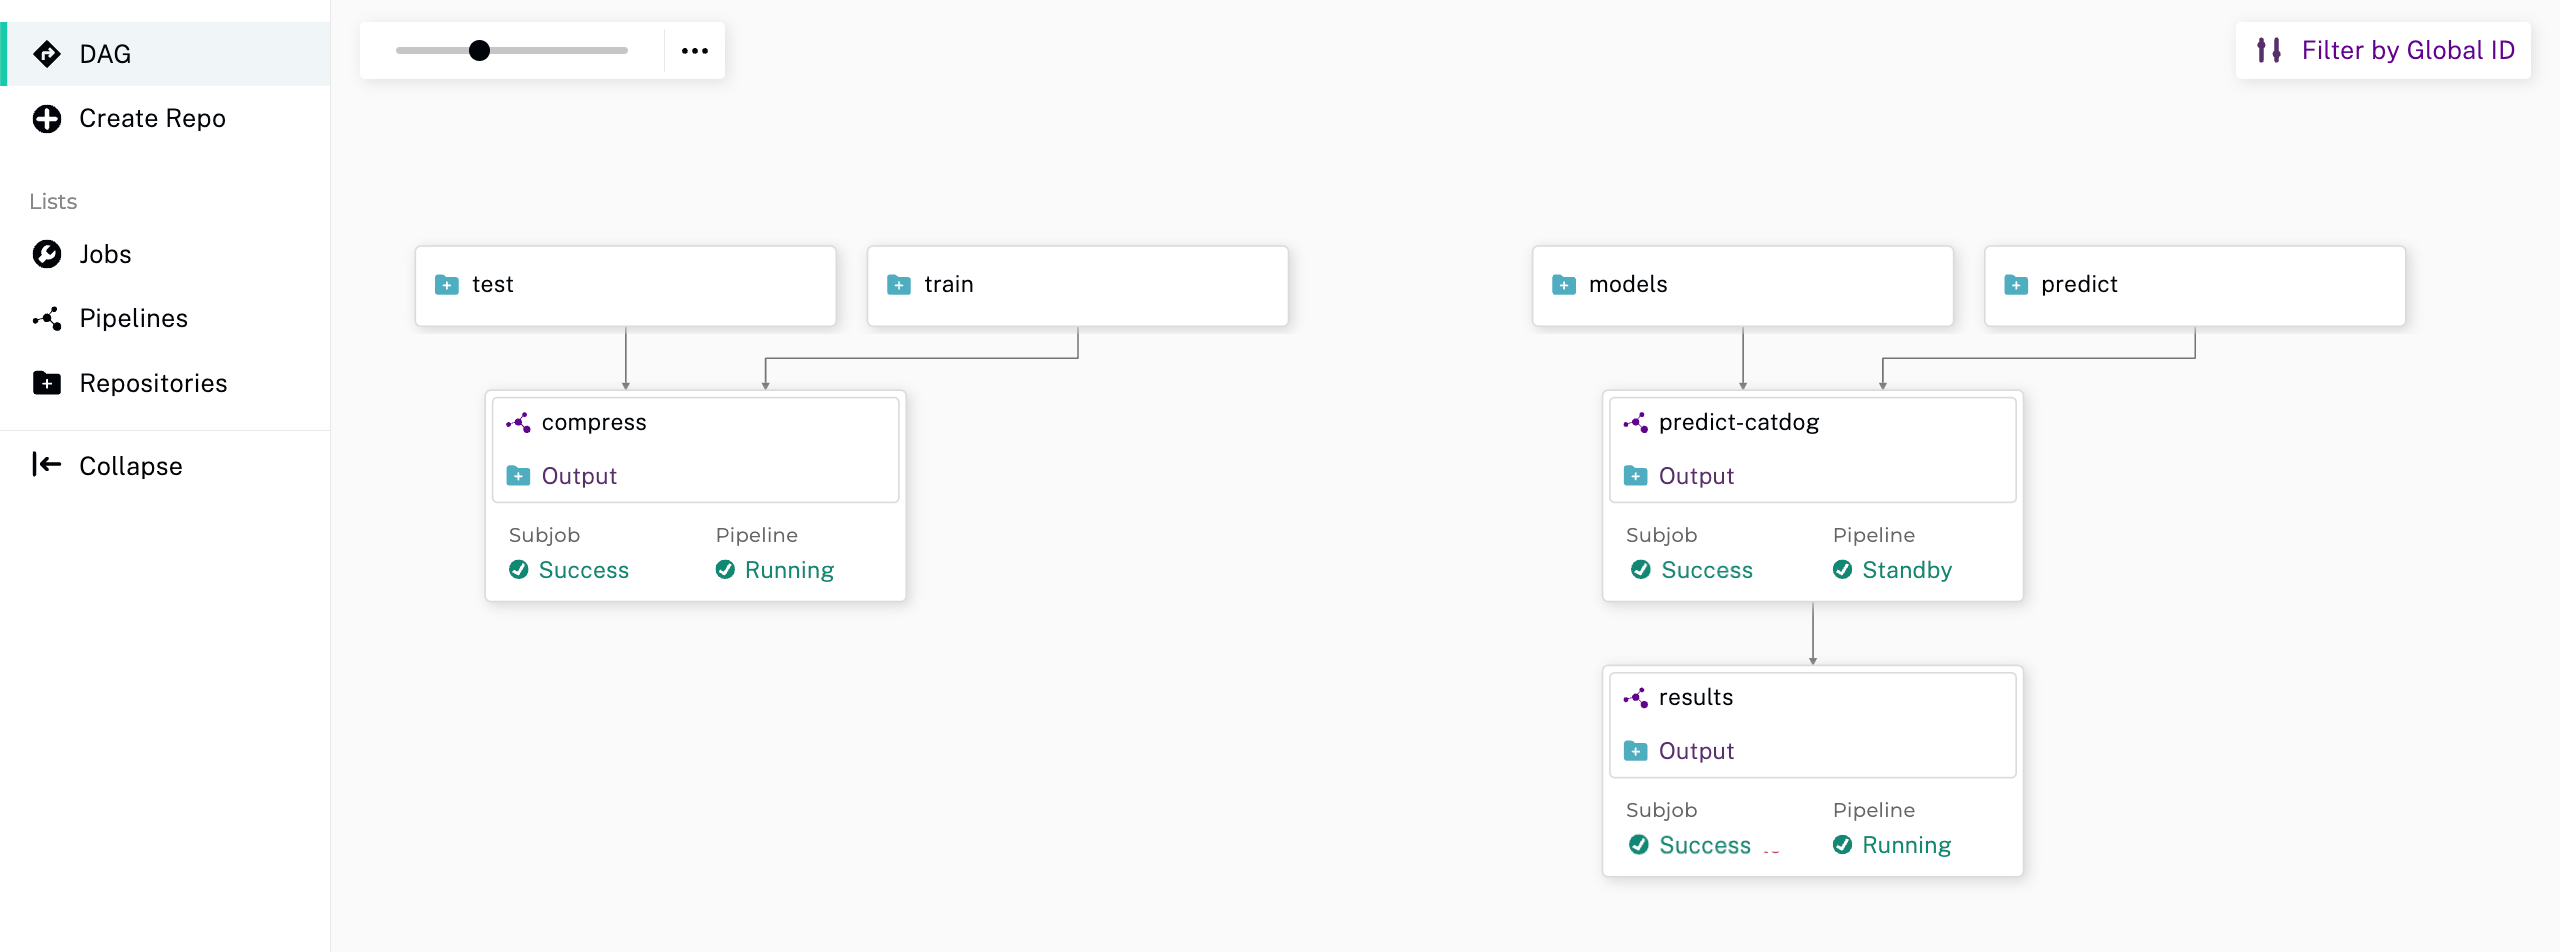
You should see the new pipeline in your browser.
Add Data to the Train and Test Repos#
We are now ready to add files to our repos. Once we add the files, Pachyderm will send them through the compress pipeline and produce a single tar file.
To add data, run the following commands:
pachctl put file -r train@master:/ -f ./data/train_1000
pachctl put file -r test@master:/ -f ./data/test_1000
To verify the repos:
pachctl list repo
The repo list displays and includes the size of each repo.
PROJECT |
NAME |
CREATED |
SIZE (MASTER) |
DESCRIPTION |
|---|---|---|---|---|
batch-inference-1 |
compress |
5 seconds ago |
≤ 21.13MiB |
Output repo for pipeline batch-inference-1/compress. |
batch-inference-1 |
train |
2 minutes ago |
≤ 17.36MiB |
|
batch-inference-1 |
test |
2 minutes ago |
≤ 4.207MiB |
Train Your Models in Determined#
We’ll use a Determined cluster to train our model based on the compressed data that is stored and versioned in Pachyderm. To run an experiment in Determined, you need, at minimum, a script and an experiment configuration (YAML) file.
To run our experiment in Determined using our data in our Pachyderm pipeline, we’ll just need to provide the following information to Determined: the Pachyderm host, port, project, repo, and branch. With this information, Determined will know where to download the data we want to use for our experiment. We provide this information to Determined via the experiment configuration file.
View the configuration for the experiment by running the following command:
cat ./determined/train.yaml
The configuration should resemble the following:
description: catdog_single_train
data:
  pachyderm:
    host: PACHD_HOST
    port: PACHD_PORT
    project: batch-inference-1
    repo: compress
    branch: master
hyperparameters:
  learning_rate: 0.005
  global_batch_size: 16
  weight_decay: 1.0e-4
  nesterov: true
searcher:
  name: single
  metric: accuracy
  smaller_is_better: false
entrypoint: model_def:CatDogModel
scheduling_unit: 10
min_validation_period:
  batches: 10
Create the experiment by first modifying and then running the following command:
Note
To modify the command and avoid a failed experiment, you’ll need to retrieve the host and port of your Pachyderm cluster.
det experiment create ./determined/train.yaml ./determined --config data.pachyderm.host=Yourhostname --config data.pachyderm.port=80
Upon successful creation, you should see the following output:
Preparing files to send to master… 19.0KB and 11 files Created experiment 10
Visit the Determined dashboard to view the progress of your experiment. One way to do this is to
enter the following URL: http://localhost:8080/ in your browser. This is the cluster address for
your local training environment.
Accept the default username of determined, and click Sign In. After signing in, create a
strong password.
Wait until Determined displays Best Checkpoint before continuing on to the next step. Then, obtain the ID of the completed trial, you’ll need this to download the checkpoint.
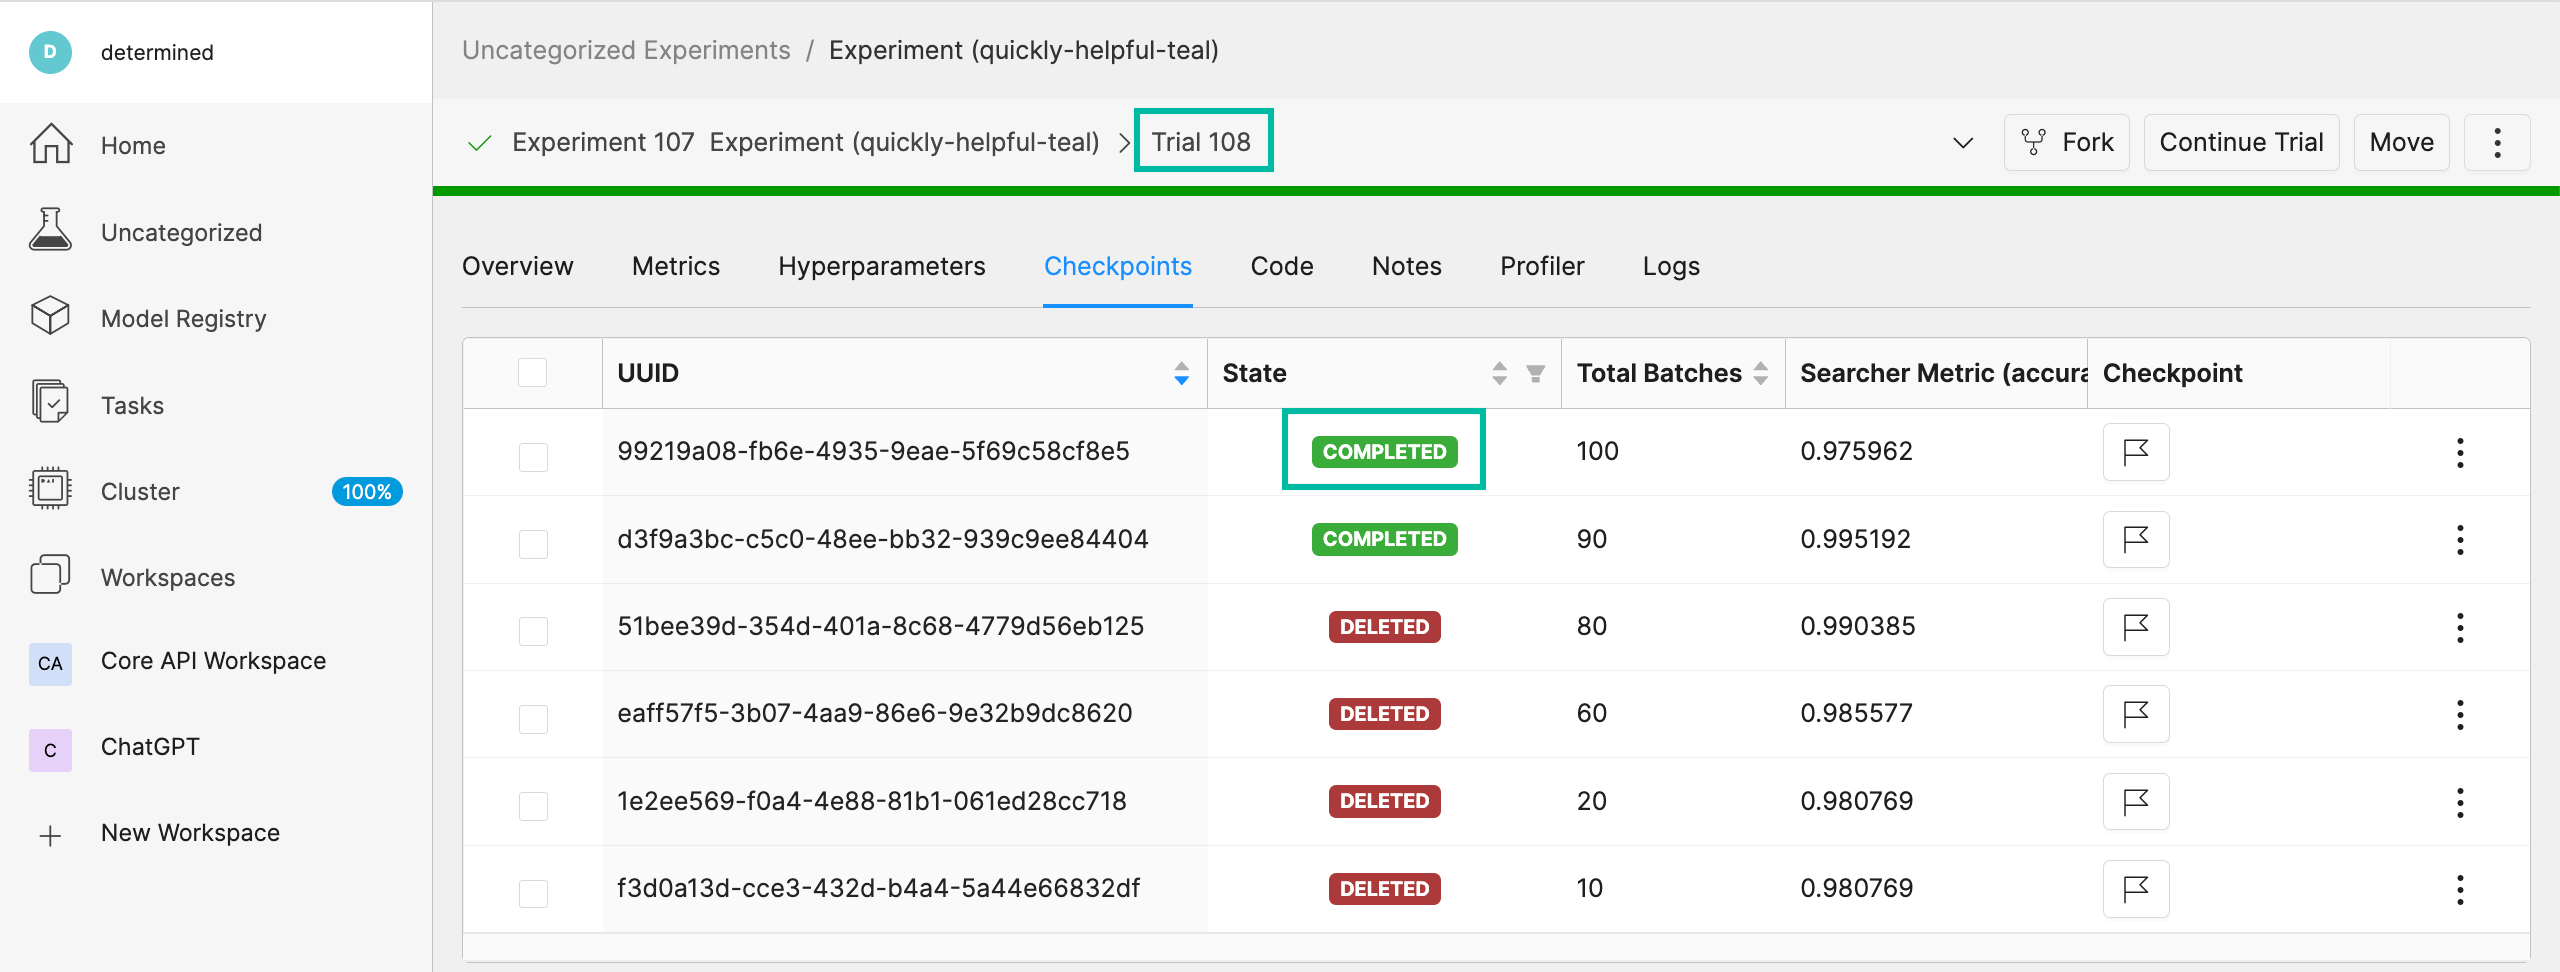
Download Checkpoints from Determined#
After training your model using Determined, you’ll likely want to access and retain the best-performing checkpoints. By following the steps below, you can download the desired checkpoint and subsequently store it within a Pachyderm repo for future reference.
To run the following command, ensure you replace the trial ID with the ID of your recently completed trial.
det trial download 10 --best -o ./data/checkpoints/catdog1000
Upon execution, you should expect to see the following output:
Local checkpoint path: data/checkpoints/catdog1000
Create Repos for Storing Our Models#
Now, let’s create a new repo to store our models:
pachctl create repo models
Verify the repo’s creation by listing all available repos:
pachctl list repo
Lastly, to add the checkpoint to your newly created repo, run the following command:
pachctl put file -r models@master:/catdog1000 -f ./data/checkpoints/catdog1000
Create a Repo and Pipeline for Inferencing#
Now that we have our trained model stored in the models repo, let’s establish a new repository and pipeline dedicated to inferencing. This step allows for the model’s utilization in predicting batches of files. Additionally, to enhance the processing speed and manage higher loads, we can introduce a parallelism specification in our pipeline spec.
Start by creating the predict repo:
pachctl create repo predict
To verify the repo creation, list all the available repos:
pachctl list repo
The table output should be as follows:
PROJECT |
NAME |
CREATED |
SIZE (MASTER) |
DESCRIPTION |
|---|---|---|---|---|
batch-inference-1 |
predict |
2 seconds ago |
≤ 0B |
|
batch-inference-1 |
models |
36 seconds ago |
≤ 179.8MiB |
|
batch-inference-1 |
compress |
38 minutes ago |
≤ 21.13MiB |
Output repo for pipeline batch-inference-1/compress. |
batch-inference-1 |
train |
41 minutes ago |
≤ 17.36MiB |
|
batch-inference-1 |
test |
41 minutes ago |
≤ 4.207MiB |
Next, create the pipeline for prediction:
pachctl create pipeline -f ./pachyderm/pipelines/predict/predict.json
Add Some Files for Pachyderm/Determined to Inference#
After setting up the pipeline, we can now push some files for the prediction. This is flexible; you can add any number of files to the predict repo at any time. Keep in mind that our pipelines will not only generate an image as output but also store the prediction result as a row in a CSV.
To add files for prediction, run:
pachctl put file -r predict@master -f ./data/predict/batch_10
Add a Results Pipeline#
Next, we’ll set up a results pipeline. Its role is to gather all the predictions and then process them to generate various visualizations like charts. Additionally, it can store these predictions in a structured database format.
Start by creating the results pipeline:
pachctl create pipeline -f ./pachyderm/pipelines/results/results.json
Add More Files for Prediction and Results Pipelines#
To watch all of the prediction and results pipelines run, add more files by running the following commands:
pachctl put file -r predict@master -f ./data/predict/batch_5_2
Next Steps#
Congratulations! You’ve successfully streamlined the task of building a batch inferencing pipeline using Pachyderm and Determined together! Now you can try applying the same steps to your own use case.