RBAC#
Attention
RBAC is only available on Determined Enterprise Edition.
Getting Started#
Warning
If you want to enable RBAC on an existing Determined installation, consult the migration guide.
By default, a Determined installation comes with role-based access control disabled. To enable RBAC, set the following option in the master config:
security:
  authz:
    type: rbac
A new cluster deployed with the Helm Chart includes two default
users, admin and determined. You must either configure an initial password for the these
default users or deactivate them.
The
adminuser has full cluster access by default through the pre-cannedClusterAdminrole.The
determineduser has no permissions.
Important
For your security, set strong passwords for any service accessible from the internet. Malicious actors are always scanning for vulnerabilities. Unauthorized access to your cluster could lead to data breaches, unauthorized processes like crypto mining, high costs, and disruptions to legitimate usage.
Example Setup (CLI)#
In this section, we will configure a Determined instance to support a cluster administrator account, and a few engineers with varying level of access.
First, create a new user alice, set a strong password, make it an admin, and deactivate the
default accounts:
det -u admin user create alice
det user change-password alice
det rbac assign-role -u alice ClusterAdmin
det user login alice
det user deactivate admin
det user deactivate determined
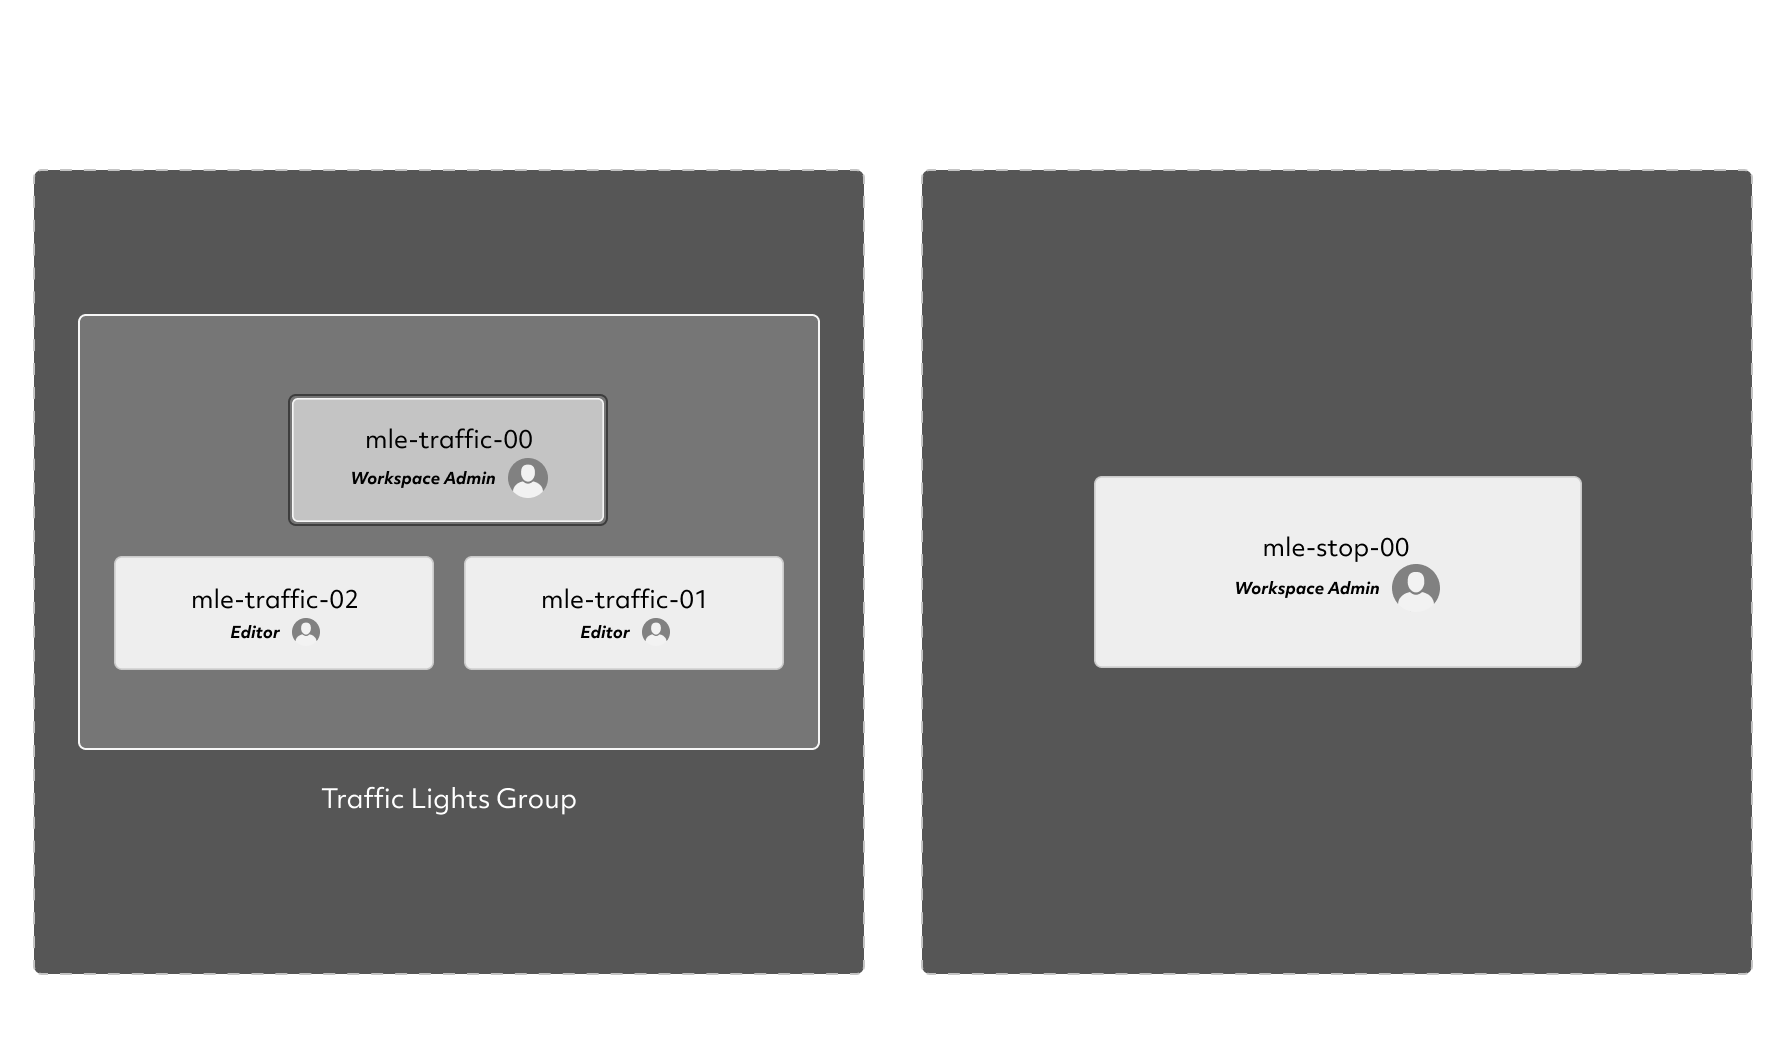
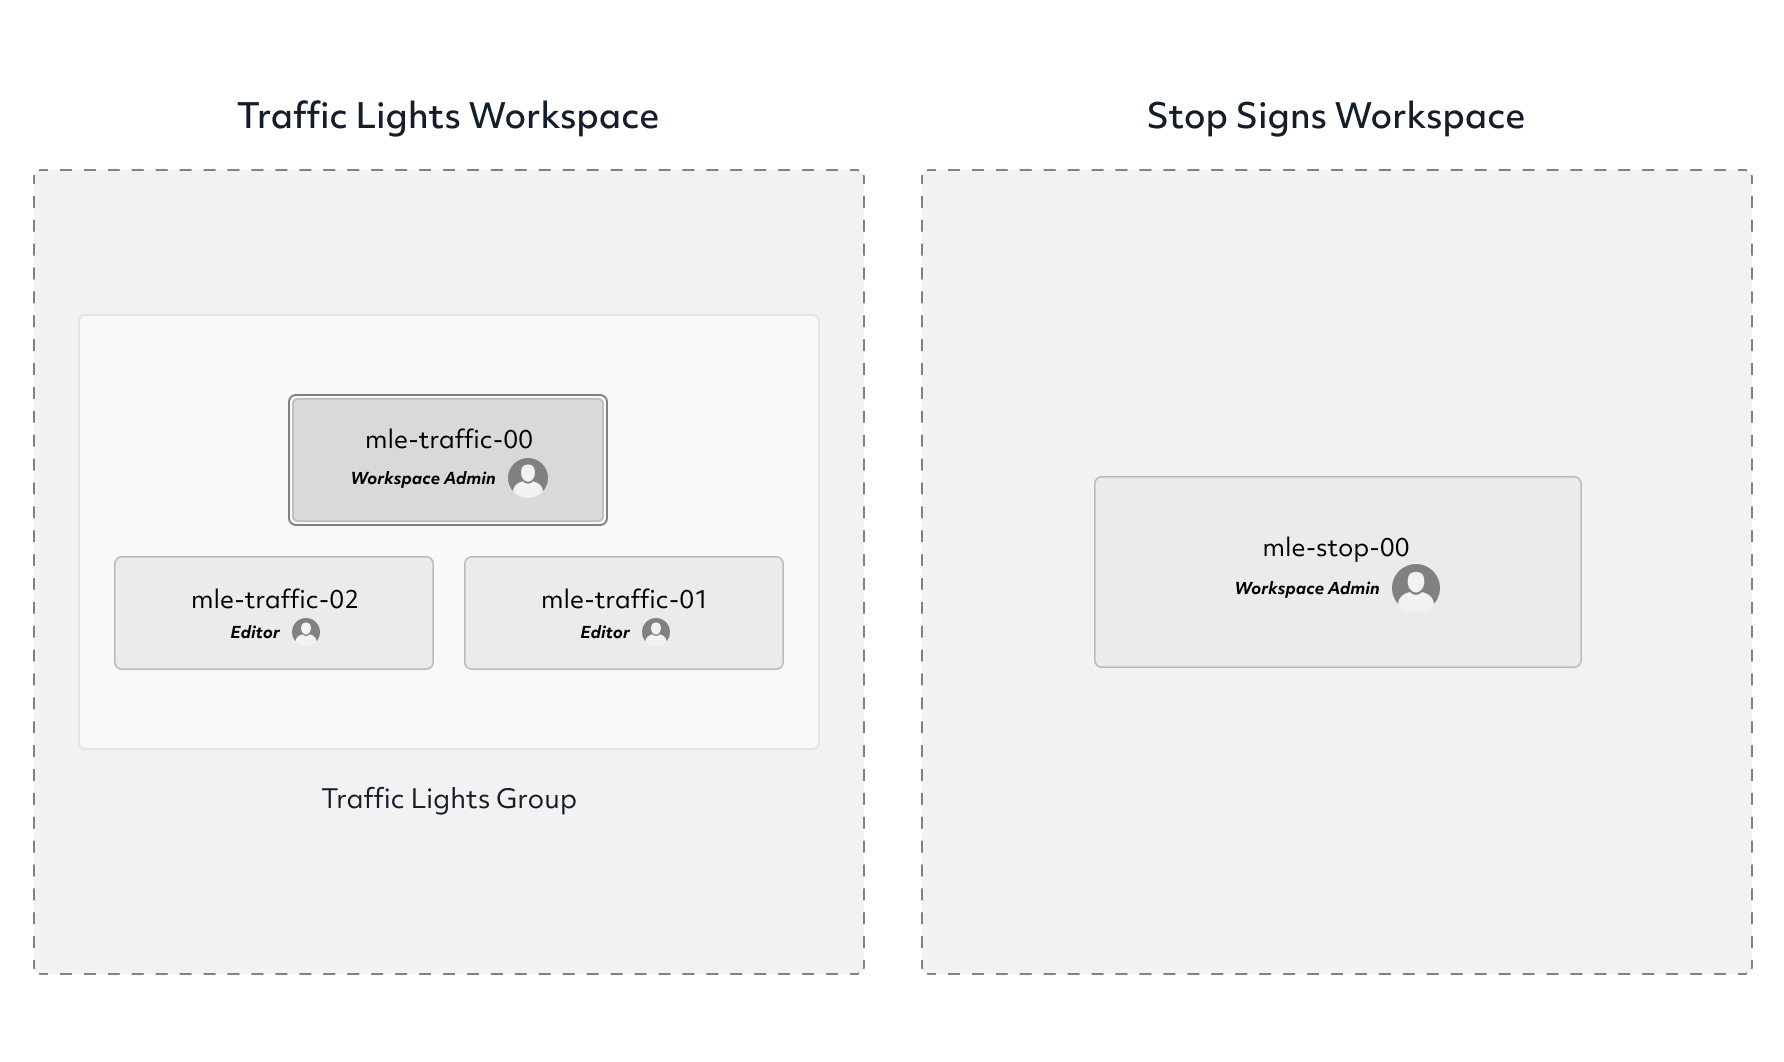
We want to enable two teams, one working on a traffic light detection model, and another one working on a stop signs detection model. We’d like these two teams to have their separate, compartmentalized workspaces. Start with creating non-priviledged users and workspaces:
det user create mle-traffic-00
det user create mle-traffic-01
det user create mle-traffic-02
det user create mle-stop-00
det workspace create "Traffic Lights"
det workspace create "Stop Signs"
We have several users on the traffic lights team, so we will create a user group to simplify the permission management:
det user-group create "Traffic Lights Team"
det user-group add-user "Traffic Lights Team" mle-traffic-00,mle-traffic-01,mle-traffic-02
Give Editor role on traffic lights workspace to entire traffic lights team, and
WorkspaceAdmin role to the mle-traffic-00 and mle-stop-00 users on their respective
workspace.
det rbac assign-role -g "Traffic Lights Team" -w "Traffic Lights" Editor
det rbac assign-role -u mle-traffic-00 -w "Traffic Lights" WorkspaceAdmin
det rbac assign-role -u mle-stop-00 -w "Stop Signs" WorkspaceAdmin
We now have two independent workspaces, one for each team.
Note
You can learn more about pre-canned roles such as Editor, WorkspaceAdmin in the
Pre-Canned Roles section.
Determined requires the projects to exist within the workspaces to run and organize the experiments.
Project creation requires PERMISSION_TYPE_CREATE_PROJECT permission which is included in
Editor, WorkspaceAdmin, and ClusterAdmin roles. Since mle-traffic-01 user is a
member of Traffic Lights Team which has the Editor role on the Traffic Lights workspace,
they can create the project themselves, no cluster admin access or participation is necessary:
det -u mle-traffic-01 project create "Traffic Lights" "Green"
Tip
We use det -u USER_NAME to dynamically change the username for the current command here.
Similarly, you can run det user login USER_NAME to switch the current CLI user permanently.
As a non-privileged user, we can now submit an experiment into this project:
# Per quickstart, `cd` into the example directory before the next command.
det -u mle-traffic-01 experiment create const.yaml . --config workspace="Traffic Lights" --config project="Green" --config name="green light"
Repeat the process to submit a second test experiment as a Stop Signs engineer:
det -u mle-stop-00 project create "Stop Signs" "Euro"
det -u mle-stop-00 experiment create const.yaml . --config workspace="Stop Signs" --config project="Euro" --config name="euro stop"
Since the admin and non-admin users on various teams have different access, listing all experiments will produce different results. The admin will see both experiments. Traffic lights and stop signs engineers will only have access to the experiments in their respective workspaces. Compare:
det -u alice experiment list --all
det -u mle-stop-00 experiment list --all
det -u mle-traffic-00 experiment list --all
Manage RBAC#
Inspecting the Setup#
CLI#
To get help with the user command:
det user -h
To get the current user’s permission list:
det rbac my-permissions
To list all permissions on the role as well as all users and groups who bear it, whether globally or at a workspace level:
det rbac describe-role ROLE
To list all existing roles and their permissions:
det rbac list-roles
To list all users, groups, and their membership:
det user list --all
det user-group list
det user-group describe GROUP_NAME
To list only active users, remove the --all (or --a) option:
det user list
To create a new remote user:
det -u admin user create <username> --remote
To list the role assignments for a user or a group:
det rbac list-groups-roles GROUP_NAME
det rbac list-users-roles USER_NAME
WebUI#
To manage users and groups via the WebUI:
View Admin Settings by selecting your profile in the upper left corner and then choosing Admin.
Admin Settings displays the Users and Groups lists.
To create new users, select Add User. When creating a new, non-remote user, password requirements apply.
To set the user as a remote user:, select the Remote option.
Note
You can edit any existing user and set them as a remote user to prevent password sign-on and requiring the user to sign on via the organization’s IdP.
To manage user roles assigned at the global scope:
Click triple-dot icon on the right of the user entry.
Choose Edit User.
To manage group roles assigned at the global scope:
Click triple-dot icon on the right of the group entry.
Select Edit Group.
Click inside Select Global Roles and add or remove roles.
To manage group membership, expand the group by selecting the plus icon.
To remove member users, open the group membership list and select Remove next to the user entry.
To add member users,
Click triple-dot icon on the right of the group entry.
Choose Add Members to Group.
Managing User Groups#
CLI#
To create a group GROUP_NAME, add and remove users USER_NAME1, USER_NAME2, and
USER_NAME3:
det user-group create GROUP_NAME
det user-group add-user GROUP_NAME USER_NAME1,USER_NAME2,USER_NAME3
det user-group remove-user GROUP_NAME USER_NAME1,USER_NAME2,USER_NAME3
To rename a group:
det user-group change-name GROUP_NAME
To delete a group:
det user-group delete GROUP_NAME
To list existing groups, or a particular group membership:
det user-group list
det user-group describe GROUP_NAME
WebUI#
Attention
Only users with the ClusterAdmin role can add or remove users and groups.
To manage user groups via the WebUI:
View Admin Settings by selecting your profile in the upper left corner and then choosing Admin.
Select the Groups tab.
To create new groups, select New Group.
To delete a group:
Select the triple-dot icon on the right of the group entry.
Choose Delete Group.
Managing Role Assignments#
CLI#
To assign or unassign a role for a user or a group globally:
det rbac assign-role -u USER_NAME ROLE_NAME
det rbac unassign-role -u USER_NAME ROLE_NAME
det rbac assign-role -g GROUP_NAME ROLE_NAME
det rbac unassign-role -g GROUP_NAME ROLE_NAME
To assign or unassign a role for a user or a group on a particular workspace, use -w
WORKSPACE_NAME switch:
det rbac assign-role -u USER_NAME ROLE_NAME -w WORKSPACE_NAME
det rbac unassign-role -u USER_NAME ROLE_NAME -w WORKSPACE_NAME
det rbac assign-role -g GROUP_NAME ROLE_NAME -w WORKSPACE_NAME
det rbac unassign-role -g GROUP_NAME ROLE_NAME -w WORKSPACE_NAME
WebUI#
To assign or unassign a role for a user or a group globally, navigate to user or group management in the WeUI:
Attention
Only users with the ClusterAdmin role can add/edit global role assignments for users and groups from the “Admin” menu as described immediately below.
View Admin Settings by selecting your profile in the upper left corner and then choosing Admin.
Admin Settings displays the Users and Groups lists.
Then, for users:
Click triple-dot icon on the right of the user entry.
Choose Edit User.
For groups:
Click triple-dot icon on the right of the group entry.
Choose Edit Group.
To assign or unassign a role for a user or a group on a particular workspace:
Attention
Only users with the WorkspaceAdmin role can add/edit workspace-scoped role assignments for users and groups.
Go to the workspaces page, select the target workspace.
Select the Members tab.
To create new role assignments, click Add Members.
To remove existing role assignments, click the triple-dot menu for a user/group and select Remove.
To edit the role, click on the dropdown in the role column for a user/group and choose a role.
About RBAC Concepts#
User Groups#
User groups in Determined are organizational units containing one or more Determined users. User groups currently have no inherent functionality and are not directly useful unless paired with the RBAC feature. Users with cluster admin permissions may create groups and add as many users to them as needed.
RBAC Permissions and Scopes#
RBAC allows granting users or user groups a permission to do certain actions, such as various API calls, on certain resources, such as experiments. This is achieved using role assignments, which are comprised of security principal, role, and scope. Roles, in turn, are comprised of permissions.
Security Principal#
A security principal is an entity that is performing an action on a resource. Determined supports individual users or user groups as security principals.
Scope#
A scope in Determined refers to where a user may exercise their permitted actions and currently has two possible values: global and workspace-specific. A global-level permission is valid anywhere in Determined, allowing the user to perform the action on any workspace. A workspace-level permission restricts actions so that they are only permissible on the specified workspaces. When using workspace-level permissions, the admin must specify which workspace(s) the permission is valid for.
Role#
A role is a collection of permissions. It allows combining commonly used permissions, for example when several permissions are used by the same persona, like an ML engineer. Determined currently supports several built-in roles.
Permission#
A permission is a description of a type of access to a resource or set of resources. Permissions typically map to an action on an entity type, for example:
PERMISSION_TYPE_VIEW_EXPERIMENT_METADATA: view high-level experiment properties.PERMISSION_TYPE_VIEW_EXPERIMENT_ARTIFACTS: view experiment code and checkpoints.PERMISSION_TYPE_ADMINISTRATE_USER: manage user accounts. This is only available on the global scope.PERMISSION_TYPE_ASSIGN_ROLES: assign roles.
Usage Reference#
CLI#
The Determined CLI has built-in help. Please see help for the top-level commands, as well as their subcommands:
det user -h
det user-group -h
det rbac -h
det rbac assign-role -h
Pre-Canned Roles#
Determined ships with several pre-canned roles. We are looking to add an ability to edit or create custom roles in a future release.
To list all existing cluster roles and the concrete permissions they include:
det rbac list-roles
ModelRegistryViewer#
The ModelRegistryViewer role contains the sole permission to view the Model Registry within its
scope.
Viewer#
The Viewer role supersedes the ModelRegistryViewer role and includes permissions to see
workspaces, projects, notebooks, TensorBoards, shells, commands (NTSC), and experiments, as well as
experiment metadata and artifacts within its scope.
EditorRestricted#
The EditorRestricted role supersedes the Viewer role and includes permissions to create,
edit, or delete projects and experiments within its scope.
EditorRestrictedusers lack the permissions to create or update NSC (notebook, shell, command) type workloads.EditorRestrictedusers can still open and use scoped JupyterLab notebooks and perform all experiment-related jobs, just like those with theEditorrole. The only additional permissions granted by theEditorrole include the ability to create notebooks, shells, and commands (NSC tasks), as well as the permission to update these tasks, such as changing the task’s priority or deleting it.
EditorProjectRestricted#
The EditorProjectRestricted role supersedes the Viewer role and precedes the Editor
role. Assign the EditorProjectRestricted to users who need Editor permissions without the
ability to create or update projects. More specifically:
EditorProjectRestrictedusers can create, edit, or delete experiments and notebook, TensorBoard, shell, or Command (NTSC) type workloads within their designated scope, just like those with theEditorrole. However,EditorProjectRestrictedusers lack the permissions to create or update projects.
Editor#
The Editor role supersedes the EditorRestricted role and includes permissions to create or
update NTSC tasks within its scope.
WorkspaceAdmin#
The WorkspaceAdmin role supersedes the Editor role and includes permissions to edit or
delete workspaces, and modify role assignments within its scope.
Users who take this role on a particular workspace can assign roles to other users on this workspace, that is, add other members (viewers, editors, or workspace admins) to the workspace.
In addition, WorkspaceAdmin users can create, modify, and delete Config Policies for their workspace, allowing them to set resource limits and default configurations for workloads within their workspace.
WorkspaceCreator#
The WorkspaceCreator role grants the single permission to create new workspaces. It can only be
assigned globally.
Note
By default, when a user creates a workspace, they automatically get assigned the
WorkspaceAdmin role.
This behavior can be configured using master config:
security:
  authz:
    workspace_creator_assign_role:
      enabled: true
      role_id: ROLE_ID
where ROLE_ID is the integer role identifier, as listed in det rbac list-roles. To
disable the assignment of any roles to the newly created workspace, set enabled: false.
TokenCreator#
The TokenCreator grants users the ability to create, view, and revoke their own access tokens.
It can only be assigned globally.
ClusterAdmin#
The ClusterAdmin role includes all permissions of the WorkspaceAdmin role across all
workspaces, as well as additional cluster-wide permissions. This includes the ability to:
Create, modify, and delete global Config Policies that apply to the entire cluster.
Override workspace-level Config Policies when necessary.
Migrating Existing Installation to RBAC#
Upgrade Determined to the latest RBAC-enabled version.
Enable RBAC UI in the master config:
security:
  authz:
    rbac_ui_enabled: true
Restart Determined for the config change to take effect. This config option will enable RBAC APIs and UI, but the RBAC rules will not be enforced, allowing administrators to set it up first.
For all cluster administrators or superusers, grant the
ClusterAdminrole. This will ensure the admins are not “locked out” once strict RBAC enforcement is enabled.det rbac assign-role -u ADMIN_USER_NAME ClusterAdmin
Enable RBAC enforcement in the master config:
security:
  authz:
    type: rbac
Restart master for the change to take effect.
Proceed to configure RBAC as desired.
Note
Workspace creators for workspaces created after upgrading to 0.19.6+ will have WorkspaceAdmin
role assigned for their workspaces.
Users will have no default access otherwise.
Config Policies and RBAC#
Config Policies work in conjunction with RBAC to provide fine-grained control over resource usage and workload configurations. While RBAC controls who can access what resources, Config Policies define how those resources can be used.
Only users with the ClusterAdmin role can create, modify, or delete global Config Policies.
Users with the WorkspaceAdmin role can create, modify, or delete Config Policies for their respective workspaces.
Config Policies set at the cluster level take precedence over workspace-level policies.
For more information on setting up and managing Config Policies, refer to the Config Policies Guide.