Introduction to Determined#
Determined is an all-in-one deep learning platform, compatible with PyTorch and TensorFlow.
It takes care of:
Distributed training for faster results.
Hyperparameter tuning for obtaining the best models.
Resource management for cutting cloud GPU costs.
Experiment tracking for analysis and reproducibility.
Features#
Configurable Interactive Jobs#
The behavior of interactive jobs, such as TensorBoards, notebooks, commands, and shells, can be influenced by setting a variety of configuration variables. These configuration variables are similar but not identical to the configuration options supported by experiments.
Configuration settings can be specified by passing a YAML configuration file when launching the workload via the Determined CLI.
Configuration variables can also be set directly on the command line when any Determined task, except a TensorBoard, is launched.
Options set via --config take precedence over values specified in the configuration file.
Configuration settings are compatible with any Determined task unless otherwise specified.
Determined CLI#
One of the key components of the Determined platform is the command-line interface (CLI). The CLI serves as a primary entry point for interacting with Determined, providing a way to efficiently manage and control various aspects of the system. The following list describes some of the tasks you can perform with the Determined CLI:
Experiment management: Running experiments is a fundamental part of the machine learning process. With the CLI, you can effortlessly create, list, and manage experiments, as well as access important experiment metrics and logs.
Queue management: The CLI enables users to manage their job queues, monitor the progress of ongoing tasks, and even prioritize or cancel jobs as needed.
Notebook management: Jupyter notebooks are an essential tool for data scientists and machine learning engineers. The CLI simplifies the process of creating, launching, and managing Jupyter notebooks within the platform.
TensorBoard integration: TensorBoard is a popular visualization tool for TensorFlow projects. The CLI allows users to easily launch and manage TensorBoard instances, making it simple to visualize and analyze the training progress of their models.
Commands and Shells#
Commands and shells support free-form tasks.
In Determined, a developer uses an experiment, to run a trial. Outside of
trials, a developer can use the det cmd Command (the capitalization indicates it is a specific
feature of Determined). This Command facilitates the execution of a user-defined program on the
cluster. On the other hand, shells initiate SSH servers, enabling the interactive use of cluster
resources.
Commands and shells enable developers to use a Determined cluster and its GPUs without having to write code conforming to the trial APIs. Commands are useful for running existing code in a batch manner; shells provide access to the cluster in the form of interactive SSH sessions.
Configuration Templates#
At a typical organization, many Determined configuration files will contain similar settings. For example, all of the training workloads run at a given organization might use the same checkpoint storage configuration. One way to reduce this redundancy is to use configuration templates. With this feature, you can move settings that are shared by many experiments into a single YAML file that can then be referenced by configurations that require those settings.
Each configuration template has a unique name and is stored by the Determined master. If a configuration specifies a template, the effective configuration of the task will be the result of merging the two YAML files (configuration file and template). The semantics of this merge operation is described under Configuration Templates: Merge Behavior. Determined stores this expanded configuration so that future changes to a template will not affect the reproducibility of experiments that used a previous version of the configuration template.
A single configuration file can use at most one configuration template. A configuration template cannot use another configuration template.
Queue Management#
The Determined Queue Management system extends scheduler functionality to offer better visibility and control over scheduling decisions. It does this using the Job Queue, which provides better information about job ordering, such as which jobs are queued, and permits dynamic job modification.
Queue Management is a new feature that is available to the fair share scheduler and the priority scheduler. Queue Management, described in detail in the following sections, shows all submitted jobs and their states and lets you modify some configuration options, such as priority, position in the queue, and resource pool.
To begin managing job queues, go to the WebUI Job Queue section or use the det job set of
CLI commands.
Model Registry#
The Model Registry is a way to group conceptually related checkpoints (including ones across different experiments), store metadata and long-form notes about a model, and retrieve the latest version of a model for use or further development. The Model Registry can be accessed through the WebUI, Python SDK, REST API, or CLI, though the WebUI has some features that the others are missing.
The Model Registry is a top-level option in the navigation bar. This will take you to a page listing all of the models that currently exist in the registry, and allow you to create new models. You can select any of the existing models to go to the Model Details page, where you can view and edit detailed information about the model. There will also be a list of every version associated with the selected model, and you can go to the Version Details page to view and edit that version’s information.
For more information about how to use the model registry, visit Organize Models in the Model Registry.
Notebooks#
Jupyter Notebooks are a convenient way to develop and debug machine learning models, visualize the behavior of trained models, or even manage the training lifecycle of a model manually. Determined makes it easy to launch and manage notebooks.
Determined Notebooks have the following benefits:
Jupyter Notebooks run in containerized environments on the cluster. We can easily manage dependencies using images and virtual environments. The HTTP requests are passed through the master proxy from and to the container.
Jupyter Notebooks are automatically terminated if they are idle for a configurable duration to release resources. A notebook instance is considered to be idle if it is not receiving any HTTP traffic and it is not otherwise active (as defined by the
notebook_idle_typeoption in the task configuration).
Note
Once a notebook is terminated, it is not possible to restore the files that are not stored in the persistent directories. You need to ensure that the cluster is configured to mount persistent directories into the container and save files in the persistent directories in the container. See Save and Restore Notebook State for more information.
If you open a notebook tab in JupyterLab, it will automatically open a kernel that will not be shut down automatically so you need to manually terminate the kernels.
TensorBoards#
TensorBoard is a widely used tool for visualizing and inspecting deep learning models. Determined makes it easy to use TensorBoard to examine a single experiment or to compare multiple experiments.
TensorBoard instances can be launched via the WebUI or the CLI. To launch TensorBoard instances from the CLI, first install the CLI on your development machine.
Workspaces and Projects#
Workspaces and projects provide a way to organize experiments. A project is a collection of experiments, and a workspace is a collection of projects. Learn more about workspaces and projects at Workspaces and Projects.
Benefits#
Determined is a deep learning training platform that simplifies infrastructure management for domain experts while enabling configuration-based deep learning functionality that engineering-oriented practitioners might find inconvenient to implement. The Determined cohesive, end-to-end training platform provides best-in-class functionality for deep learning model training, including the following benefits:
Implementation |
Benefit |
|---|---|
Automated model tuning |
Optimize models by searching through conventional hyperparameters or macro- architectures, using a variety of search algorithms. Hyperparameter searches are automatically parallelized across the accelerators in the cluster. See Hyperparameter Tuning. |
Cluster-backed notebooks, commands, and shells |
Leverage your shared cluster computing devices in a more versatile environment. See Jupyter Notebooks and Commands and Shells. |
Cluster management |
Automatically manage ML accelerators, such as GPUs, on-premise or in cloud VMs using your own environment, automatically scaling for your on-demand workloads. Determined runs in either AWS or GCP, so you can switch easily according to your requirements. See Resource Pools, Scheduling, and Elastic Infrastructure. |
Containerization |
Develop and train models in customizable containers that enable simple, consistent dependency management throughout the model development lifecycle. See Customize Your Environment. |
Distributed training |
Easily distribute a single training job across multiple accelerators to speed up model training and reduce model development iteration time. Determined uses synchronous, data-parallel distributed training, with key performance optimizations over other available options. See Distributed Training Concepts. |
Experiment collaboration |
Automatically track your experiment configuration and environment to facilitate reproducibility and collaboration among teams. See Create and Submit an Experiment. |
Fault tolerance |
Models are checkpointed throughout the training process and can be restarted from the latest checkpoint, automatically. This enables training jobs to automatically tolerate transient hardware or system issues in the cluster. |
Framework support |
Broad framework support leverages these capabilities using any of the leading machine learning frameworks without needing to manage a different cluster for each. Different frameworks for different models can be used without risking future lock-in. See Training APIs. |
Profiling |
Optimize your model’s performance and diagnose bottlenecks with comprehensive profiling support across different layers of your deployment, from out-of-the-box system metrics tracking and seamless integrations with native training profilers to Prometheus/Grafana support. See Profiling. |
Visualization |
Visualize your model and training procedure by using The built-in WebUI and by launching managed Using TensorBoard instances. |
Concepts#
Elastic Infrastructure#
When running in an AWS or GCP cloud environment, Determined can automatically provision and terminate GPU instances as the set of workloads on the cluster changes. This capability is called elastic infrastructure. The agents that are provisioned by the system are called dynamic agents.
The diagram below outlines the high-level system architecture when using dynamic agents:
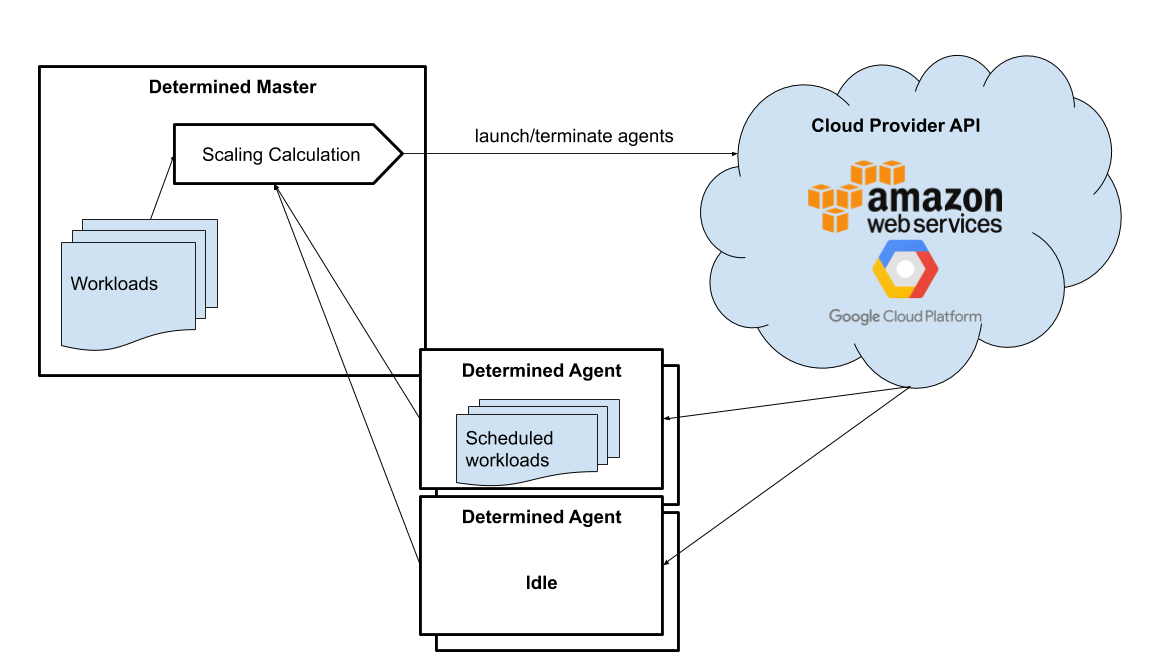
Following the diagram, the execution would be:
The master collects information on idle agents (agents with no active workloads) and pending workloads (agents waiting to be scheduled).
The master calculates the ideal size of the cluster and decides how many agents to launch and which agents to terminate. The calculation is based on the total resource requests of all jobs submitted to the cluster, configured scaling behavior (minimum and maximum amount of instances the master can spawn), and the specification of the resource pools.
An agent that is not running any containers is considered idle. By default, idle dynamic agents will automatically be terminated after 5 minutes of inactivity. This behavior gives agents a chance to run multiple workloads after they have been provisioned.
The master makes API calls to agent providers, such as AWS and GCP, to provision and terminate agents as necessary.
Once the agent instance has been created, it will automatically connect to the current master. The time it takes to create a new instance depends on the cloud provider and the configured instance type, but >60 seconds is typical.
Experiment#
An experiment represents the basic unit of running the model training code. An experiment is a collection of one or more trials that are exploring a user-defined hyperparameter space. For example, during a learning rate hyperparameter search, an experiment might consist of three trials with learning rates of .001, .01, and .1.
To run experiments, you need to write your model training code. A model definition represents a specification of a deep learning model and its training procedure. It contains training code that implements training APIs. Visit the Training API Guides for more information.
For each experiment, you can configure a searcher, also known as a search algorithm. The search algorithm determines how many trials will be run for a particular experiment and how the hyperparameters will be set. More information can be found at Hyperparameter Tuning.
Resource Pools#
To run tasks such as experiments or notebooks, Determined needs to have resources (CPUs, GPUs) on which to run the tasks. However, different tasks have different resource requirements and, given the cost of GPU resources, it is important to choose the right resources for specific goals so that you get the most value out of your money. For example, you may want to run your training on beefy V100 GPU machines, while you want your TensorBoards to run on cheap CPU machines with minimal resources.
Determined has the concept of a resource pool, which is a collection of identical resources that are located physically close to each other. Determined allows you to configure your cluster to have multiple resource pools and to assign tasks to a specific resource pool so that you can use different sets of resources for different tasks. Each resource pool handles scheduling and instance provisioning independently.
When you configure a cluster, you set which pool is the default for auxiliary tasks and which pool
is the default for compute tasks. CPU-only tasks such as TensorBoards will run on the default
auxiliary pool unless you specify that they should run in a different pool when launching the task.
Tasks that require a slot, such as experiments or GPU notebooks, will use the default compute pool
unless otherwise specified. For this reason it is recommended that you always create a cluster with
at least two pools, one with low-cost CPU instances for auxiliary tasks and one with GPU instances
for compute tasks. This is the default setup when launching a cluster on AWS or GCP using det
deploy.
Here are some scenarios where it can be valuable to use multiple resource pools:
Use GPU for training while using CPUs for TensorBoard.
You create one pool,
aws-v100, that provisionsp3dn.24xlargeinstances (large V100 EC2 instances) and another pool,aws-cputhat provisionsm6i.largeinstances (small and cheap CPU instances). You train your experiments using theaws-v100pool, while you run your TensorBoards in theaws-cpupool. When your experiments complete, theaws-v100 poolcan scale down to zero to save money, but you can continue to run your TensorBoard. Without resource pools, you would have needed to keep ap3dn.24xlargeinstance running to keep the TensorBoard alive. By default TensorBoard will always run on the default CPU pool.Use GPUs in different availability zones on AWS.
You have one pool
aws-v100-us-east-1athat runsp3dn.24xlargein theus-east-1aavailability zone and another poolaws-v100-us-east-1bthat runsp3dn.24xlargeinstances in theus-east-1bavailability zone. You can launch an experiment intoaws-v100-us-east-1aand, if AWS does not have sufficientp3dn.24xlargecapacity in that availability zone, you can launch the experiment inaws-v100-us-east-1bto check if that availability zone has capacity. Note that the “AWS does not have capacity” notification is only visible in the master logs, not on the experiment itself.Use spot/preemptible instances and fall back to on-demand if needed.
You have one pool
aws-v100-spotthat you use to try to run training on spot instances and another poolaws-v100-on-demandthat you fall back to if AWS does not have enough spot capacity to run your job. Determined will not switch from spot to on-demand instances automatically, but by configuring resource pools appropriately, it should be easy for users to select the appropriate pool depending on the job they want to run and the current availability of spot instances in the AWS region they are using. For more information on using spot instances, refer to Use Spot Instances.Use cheaper GPUs for prototyping on small datasets and expensive GPUs for training on full datasets.
You have one pool with less expensive GPUs that you use for initial prototyping on small data sets and another pool that you use for training more mature models on large datasets.
Limitations#
Currently resource pools are completely independent from each other so it is not possible to launch an experiment that tries to use one pool and then falls back to another one if a certain condition is met. You will need to manually decide to shift an experiment from one pool to another.
A cluster is not currently allowed to have resource pools in multiple AWS/GCP regions or across multiple cloud providers. If the master is running in one AWS/GCP region, all resource pools must also be in that AWS/GCP region.
If you create a task that needs slots and specify a pool that will never have slots (i.e. a pool with CPU-only instances), that task can never get scheduled. Currently that task will appear to be PENDING permanently.
Set up Resource Pools#
Resource pools are configured using the master configuration. For each resource pool, you can configure scheduler and provider information.
If you are using static resource pools and launching agents by hand, you will need to update the agent configuration to specify which resource pool the agent should join.
To change the resource pool an agent is assigned to after it has already joined one, you need to update the agent configuration. Before making this change, ensure the agents are properly drained. Once the configuration is updated, restart the agent to connect it to the new resource pool.
Migrate to Resource Pools#
Resource pools were introduced with Determined 0.14.0, resulting in changes to the master configuration format.
Since the change is backwards-compatible, cluster configurations that use earlier formats (prior to Determined 0.14.0) will still work. A configuration in the earlier format is interpreted as a cluster with a single resource pool that is the default for both CPU and GPU tasks. To take full advantage of resource pools, convert to the latest format. Converting is a simple process of moving around and renaming a small number of top-level fields.
The earlier format had the top-level fields of scheduler and provisioner which set the
scheduler and provisioner settings for the cluster. By contrast, the latest format has the top-level
fields of resource_manager and resource_pools. The resource_manager section is for
cluster level setting such as which pools should be used by default and the default scheduler
settings. The scheduler information is identical to the scheduler field in the legacy
format. The resource_pools section is a list of resource pools each of which has a name,
description and resource pool level settings. Each resource pool can be configured with a
provider field that contains the same information as the provisioner field in the legacy
format. Each resource pool can also have a scheduler field that sets resource pool specific
scheduler settings. If the scheduler field is not set for a specific resource pool, the default
settings are used.
Note that defining resource pool-specific scheduler settings is all-or-nothing. If the
pool-specific scheduler field is blank, all scheduler settings will be inherited from the
settings defined in resource_manager.scheduler. If any fields are set in the pool-specific
scheduler section, no settings will be inherited from resource_manager.scheduler - you need
to redefine everything.
Here is an example master configuration illustrating the potential problem.
resource_manager:
  type: agent
  scheduler:
    type: fair_share
    fitting_policy: best
  default_aux_resource_pool: pool1
  default_compute_resource_pool: pool1

resource_pools:
  - pool_name: pool1
    scheduler:
      fitting_policy: worst
This example sets the cluster-wide scheduler defaults to use a best-fit, fair share scheduler in
resource_manager.scheduler. The scheduler settings at the pool level for pool1 are then
overwritten. Because scheduler.fitting_policy=worst is set, no settings are inherited from
resource_manager.scheduler so pool1 uses a worst-fit, priority scheduler because for a blank
scheduler.type field, the default value is priority.
If you want to have pool1 use a worst-fit, fair share scheduler, you need to make sure you
redefine the scheduler type at the pool-specific level:
resource_manager:
  type: agent
  scheduler:
    type: fair_share
    fitting_policy: best
  default_aux_resource_pool: pool1
  default_compute_resource_pool: pool1

resource_pools:
  - pool_name: pool1
    scheduler:
      type: fair_share
      fitting_policy: worst
Launch Tasks into Resource Pools#
When creating a task, the job configuration file has a section called “resources”. You can set the
resource_pool subfield to specify the resource_pool that a task should be launched into.
resources:
    resource_pool: pool1
If this field is not set, the task will be launched into one of the two default pools defined in the
master configuration. Experiments will be launched into the default
compute pool. TensorBoards will be launched into the default auxiliary pool. Commands, shells, and
notebooks that request a slot (which is the default behavior if the resources.slots field is not
set) will be launched into the default compute pool. Commands, shells, and notebooks that explicitly
request 0 slots (for example the “Launch CPU-only Notebook” button in the WebUI) will use the
auxiliary pool.
Scheduling#
This document covers the supported scheduling policies. The first section describes the native scheduling capabilities supported by Determined. The next section describes how Determined schedules tasks when running on Kubernetes.
Native Scheduler#
Administrators can configure the desired scheduler in master configuration file. It is also possible to configure different scheduling behavior for different resource pools.
Once the scheduling policy has been defined for the current master and/or resource pool, the scheduling behavior of an individual task is influenced by several task configuration values:
For the fair-share scheduler,
resources.weightlets users set the resource demand of a task relative to other tasks.For the priority scheduler,
resources.prioritylets users assign a priority order to tasks.Regardless of the scheduler,
searcher.max_concurrent_trialslets users cap the number of slots that anadaptive_ashahyperparameter search experiment will request at any given time.
Note
Zero-slot tasks (e.g., CPU-only notebooks, TensorBoards) are scheduled independently of tasks that require slots (e.g., experiments, GPU notebooks). The fair-share scheduler schedules zero-slot tasks on a FIFO basis. The priority scheduler schedules zero-slot tasks based on priority.
Task Priority#
The master allocates cluster resources (slots) to active tasks based on their priority. High-priority tasks are preferred to low-priority tasks. Low-priority tasks will be preempted to make space for pending high-priority tasks if possible. Tasks of equal priority are scheduled in the order in which they were created.
By default, the priority scheduler does not use preemption. If preemption is enabled in the master configuration file, when a higher priority task is pending and cannot be scheduled because no idle resources are available, the scheduler will attempt to schedule it by preempting lower priority tasks, starting with the task with the lowest priority. If there are no tasks to preempt, lower priority tasks might be backfilled on the idle resources. When a trial is preempted, its state is checkpointed so that the progress of the trial is not lost. Enabling preemption ensures that cluster resources can be reallocated to high priority tasks more promptly and backfilled to make the most use of the idle resources; however, preemption can also result in additional overhead due to checkpointing low priority tasks, which might be expensive for some models.
Notebooks, TensorBoards, shells, and commands are not preemptible. These tasks will continue to occupy cluster resources until they complete or are terminated.
The priority of any task can be changed after it is created using one of the following commands:
det experiment set priority <ID> <priority>
det command set priority <ID> <priority>
det notebook set priority <ID> <priority>
det shell set priority <ID> <priority>
det tensorboard set priority <ID> <priority>
However, since only experiments are preemptible, changing the priority of any other kind of task after it is scheduled has no effect. (It can still be useful to change the priorities of such tasks before they are scheduled in order to affect when they ultimately start running.)
An example of priority scheduler behavior with preemption enabled:
User submits a priority 2 adaptive_asha experiment with max_concurrent_trials 20 and slots_per_trial 1. 8 trials run and utilize all 8 GPUs.
User submits a priority 1 distributed training experiment with slots_per_trial 4. 4 ASHA trials are preempted so the new distributed training experiment can run. Note that if preemption was not enabled, the new experiment would not get scheduled until the ASHA experiment GPU demand becomes <= 4.
User starts a priority 3 notebook with resources.slots 1. The notebook has a lower priority than the two active experiments, so it will run as soon as the two active experiments collectively need <= 7 GPUs.
ASHA and the distributed training experiment both complete, and the notebook task with priority 3 will run.
User submits a priority 1 distributed training experiment with slots_per_trial 8. Although this workload has a higher priority than the active notebook task, it cannot be scheduled because it requires 8 slots, notebooks are not preemptible, and therefore only 7 slots are available.
User submits a priority 2 distributed training experiment with slots_per_trial 4. One trial will be scheduled to make use of the idle 7 slots.
The notebook is killed. The priority 2 distributed training experiment is preempted. And then the priority 1 distributed training experiment starts running. Once that experiment is complete, distributed training experiment with priority 2 restarts.
The priority scheduler can be used with the Determined job queue, which provides more insight into scheduling decisions.
Scheduling with Kubernetes#
When using Determined on Kubernetes, Determined workloads, such as experiments, notebooks, and shells, are started by launching Kubernetes pods. The scheduling behavior that applies to those workloads depends on how the Kubernetes scheduler has been configured.
Gang Scheduling#
By default, the Kubernetes scheduler does not perform gang scheduling or support preemption of pods. While it does take pod priority into account, it greedily schedules pods without consideration for the job each pod belongs to. This can result in problematic behavior for deep learning workloads, particularly for distributed training jobs that use many GPUs. A distributed training job that uses multiple pods requires all pods to be scheduled and running in order to make progress. Because Kubernetes does not support gang scheduling by default, cluster deadlocks can arise. For example, suppose that two experiments are launched simultaneously that each require 16 GPUs on a cluster with only 16 GPUs. It is possible that Kubernetes will assign some GPUs to one experiment and some GPUs to the other. Because neither experiment will receive the resources it needs to begin executing, the system will wait indefinitely.
One way Determined addresses these problems is through the use of the lightweight coscheduling plugin, which extends the Kubernetes scheduler to support priority-based gang scheduling. To implement gang scheduling, the coscheduling plugin will not schedule a pod unless there are enough available resources to also schedule the rest of the pods in the same job. To function, the plugin requires special labels to be set that specify the number of nodes that each job needs for execution. Determined automatically calculates and sets these labels for GPU experiments that it launches.
The coscheduling plugin is in beta and is therefore not enabled by default. To enable it, edit
values.yaml in the Determined Helm chart to set the defaultScheduler field to
coscheduler.
There are several limitations to the coscheduling plugin to be aware of:
The coscheduling plugin does not work with Kubernetes’ cluster autoscaling feature. Static node pools must be used to achieve gang scheduling
The plugin does not support preemption. For example, if the cluster is full of low priority jobs and a new high priority job is submitted, the high priority job will not be scheduled until one of the low priority jobs finishes.
The Determined capability to automatically set pod labels is restricted to GPU experiments. Determined does not currently set labels for CPU experiments or user commands.
When scheduling experiments that utilize the entire cluster, the plugin may take several minutes to schedule the next job. Because the coscheduler only approves of jobs when all of its pods are available, it may repeatedly reject partially-ready jobs, causing them to wait further.
To enable gang scheduling with commands or CPU experiments, enable the coscheduler in
values.yaml and modify the experiment config to contain the following:
environment:
   pod_spec:
      metadata:
         labels:
            pod-group.scheduling.sigs.k8s.io/name: <unique task name>
            pod-group.scheduling.sigs.k8s.io/min-available: <# of GPUs required>
      spec:
         schedulerName: coscheduler
You can also use schedulerName: default-scheduler to use the default Kubernetes scheduler.
Additionally, please note that when running Determined on Kubernetes, a higher priority value means a higher priority (e.g. a priority 50 task will run before a priority 40 task).
Priority Scheduling with Preemption#
This extension to the Kubernetes scheduler was deprecated and removed as of version 0.36.0.
Trial#
A trial is a training task with a defined set of hyperparameters. A common degenerate case is an experiment with a single trial, which corresponds to training a single deep learning model.
RBAC and User Groups#
Role Based Access Control (RBAC) enables administrators to control user access to various actions and data within Determined. RBAC feature requires Determined Enterprise Edition. Learn more about RBAC and User Group usage at RBAC.
YAML Configuration#
YAML is a markup language often used for configuration. Determined uses YAML for configuring tasks such as experiments and notebooks, as well as configuring the Determined cluster as a whole. This guide describes a subset of YAML that is recommended for use with Determined. This is not a full description of YAML; see the specification or other online guides for more details.
YAML Types#
A value in YAML can be a null or number, string, or Boolean scalar, or an array or map
collection. Collections can contain other collections nested to any depth, although, the Determined
YAML files generally have a fixed structure.
A comment in a YAML file starts with a # character and extends to the end of the line.
If you are familiar with JSON, you can think of YAML as an alternative way of expressing JSON objects that is meant to be easier for humans to read and write, since it allows comments and has fewer markup characters around the content.
Maps#
Maps represent unordered mappings from strings to YAML values. A map is written as a sequence of key-value pairs. Each key is followed by a colon and the corresponding value. The value can be on the same line as the key if it is a scalar (in which case it must be preceded by a space) or on subsequent lines (in which case it must be indented, conventionally by two spaces).
A map is used in the experiment configuration to configure hyperparameters:
hyperparameters:
  base_learning_rate: 0.001
  weight_cost: 0.0001
  global_batch_size: 64
  n_filters1: 40
  n_filters2: 40
The snippet above describes a map with one key, hyperparameters; the corresponding value is
itself a map whose keys are base_learning_rate, weight_cost, etc.
Arrays#
An array contains multiple other YAML values in some order. An array is written as a sequence of values, each one preceded by a hyphen and a space. The hyphens for one list must all be indented by the same amount.
An array is used in the experiment configuration to configure environment variables:
environment:
  environment_variables:
    - A=A
    - B=B
    - C=C
Scalars#
Scalars generally behave naturally: null, true, 2.718, and "foo" all have the same
meanings that they would in JSON (and many programming languages). However, YAML allows strings to
be unquoted: foo is the same as "foo". This behavior is often convenient, but it can lead to
unexpected behavior when small edits to a value change its type. For example, the following YAML
block represents a list containing several values whose types are listed in the comments:
- true          # Boolean
- grue          # string

- 0.0           # number
- 0.0.          # string

- foo: bar      # map
- foo:bar       # string
- foo bar       # string
Example Experiment Configuration#
A Determined configuration file consists of a YAML object with a particular structure: a map at the top level that is expected to have certain keys, with the value for each key expected to have a certain structure in turn.
In this example experiment configuration, numbers, strings, maps, and an array are demonstrated:
name: mnist_tf_const
data:
  base_url: https://s3-us-west-2.amazonaws.com/determined-ai-datasets/mnist/
  training_data: train-images-idx3-ubyte.gz
  training_labels: train-labels-idx1-ubyte.gz
  validation_set_size: 10000
hyperparameters:
  base_learning_rate: 0.001
  weight_cost: 0.0001
  global_batch_size: 64
  n_filters1: 40
  n_filters2: 40
searcher:
  name: single
  metric: error
  smaller_is_better: true
environment:
  environment_variables:
    - A=A
    - B=B
    - C=C
Reference#
Validate YAML: https://www.yamllint.com/
Convert YAML to JSON: https://www.bairesdev.com/tools/json2yaml/