Quickstart for Model Developers
This quickstart walks you through the basic steps to install and run Determined, run training experiments, and visualize training experiment results in your browser.
Three model data and code examples use the MNIST dataset to demonstrate:
training on a local, single CPU with or without a GPU.
how to run a distributed training job on multiple GPUs to improve performance.
how to use hyperparameter tuning.
A Determined cluster comprises a master and one or more agents. A master provides centralized resource management of agents installed on distributed resources. Master and agent behavior are controlled by setting configuration variables. Each of these examples uses the same model code and data with simple configuration changes for each of the three examples.
Follow these steps for a hands-on introduction to Determined. After gaining familiarity with Determined tools and procedures, replace the provided model data and code with your model data and code.
Prerequisites
Software
Determined agent and master nodes must be configured with Ubuntu 16.04 or higher, CentOS 7, or macOS 10.13 or higher.
Agent nodes must have Docker installed.
To run jobs with GPUs, Nvidia drivers, version 384.81 or higher, must be installed on each agent. Nvidia drivers can be installed as part of a CUDA installation but the rest of the CUDA toolkit is not required.
Hardware
At least 4-CPU cores are recommended for the master node, Intel Broadwell or later, and 8GB RAM, and 200GB of free disk space. The master node does not require GPUs.
at least 2-CPU cores are recommended for each agent node, Intel Broadwell or later, and 4GB RAM, and 50GB of free disk space. If you are using GPUs, Nvidia GPUs with compute capability 3.7 or greater are required, such as K80, P100, V100, A100, GTX 1080, GTX 1080 Ti, TITAN, and TITAN XP.
Docker
For the examples that use an agent, install Docker to run containerized workloads. If you do not already have Docker installed, follow the Installing Docker instructions to install and run Docker on Linux or macOS.
Training Example
These example experiments use the PyTorch MNIST image classification model:
Download the image:
mnist_pytorch.tgz.Extract the configuration and model files and browse the directory:
tar xzvf mnist_pytorch.tgz
The mnist_pytorch directory contains the YAML configuration files used in these examples.
Among other variables, configuration parameters define:
dataset location
hyperparameters
number of batches of data to use in training
entry point location of the model class
number of GPU slots
batch size
shared memory size
Each example configuration file corresponds to one of the example experiments presented in this quickstart:
Configuration Filename |
Experiment Type |
|---|---|
|
Perform a hyperparameter search using the Determined adaptive hyperparameter tuning algorithm. |
|
Train a single model on a single GPU/CPU, with constant hyperparameter values. |
|
Train a single model using multiple, distributed GPUs. |
While the Python model and data pipeline definition files are not covered in this quickstart, you might want to review them to gain an understanding of how the Determined API is used:
Filename |
Experiment Type |
|---|---|
|
Model data loading and preparation code. |
|
Convolutional layers used by the model. |
|
Model definition and training/validation loops. |
Install and Deploy Determined Locally
To install the Determined library and start a cluster locally, enter:
pip install determined
det deploy local cluster-up
If your local machine does not have a supported Nvidia GPU, include the no-gpu option to start a cluster:
det deploy local cluster-up --no-gpu
Use a Remote Determined Instance
You can also run these examples on a remote Determined master instance by setting the remote IP address before running any of the commands:
export DET_MASTER=<ipAddress>:8080
You can also include the master IP address in the command line:
det -m http://<ipAddress>:8080 experiment create distributed.yaml .
Run a Single CPU/GPU Training Job
An experiment is a training job that consists of one or more variations, or trials, of the same model. By integrating the Determined API, every experiment automatically gives you metric frequency output, plots, and checkpointing without writing extra code. The Determined WebUI displays detailed information about the model, the configuration, output logs, and training metrics.
This exercise trains a single model for a fixed number of batches, using constant values for all hyperparameters on a single slot.
In the mnist_pytorch directory, create an experiment using the const.yaml configuration file:
det experiment create const.yaml .
The last argument dot notation (.) uploads all files in the current directory to the Determined cluster and makes them available in the working directory in which each trial is run. This directory is called the context directory.
After the experiment has been submitted, you should see that the experiment is created:
Preparing files (.../mnist_pytorch) to send to master... 8.6KB and 7 files
Created experiment 1
Tip
To automatically stream log messages for the first trial in an experiment to
stdout, specifying the configuration file and context directory, enter:det e create const.yaml . --follow
Enter the cluster address in the browser to view the experiment status. If you installed locally using the
det deploy localcommand, the URL should be http://localhost:8080/.To view the dashboard, enter your username and password. If you deployed locally, accept the default determined username with no password and click Sign In:
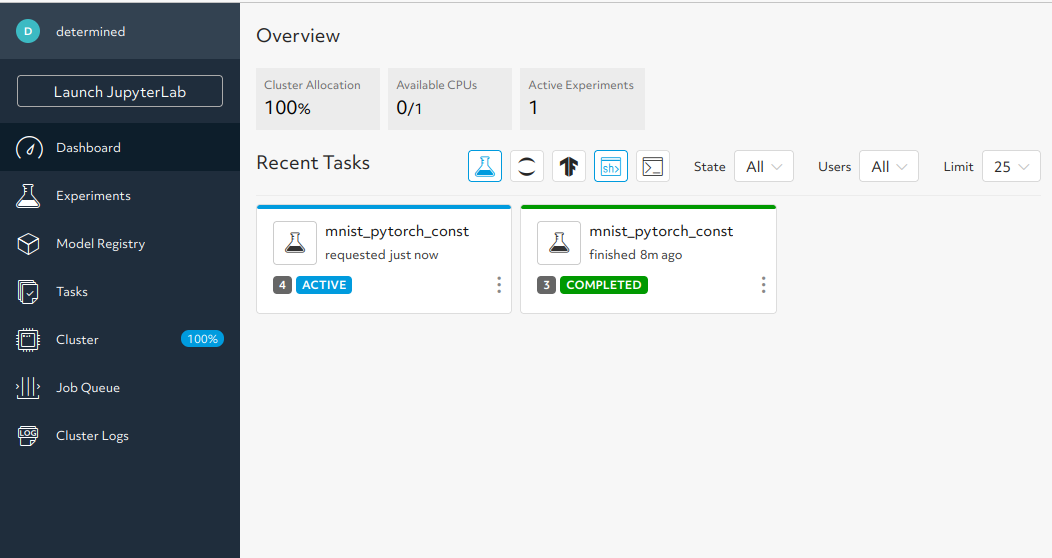
The screenshot shows that two experiments have been run, demonstrating the experiment progress notification. Notice that experiment 3 is in the COMPLETED state and experiment 4 is in the ACTIVE state.
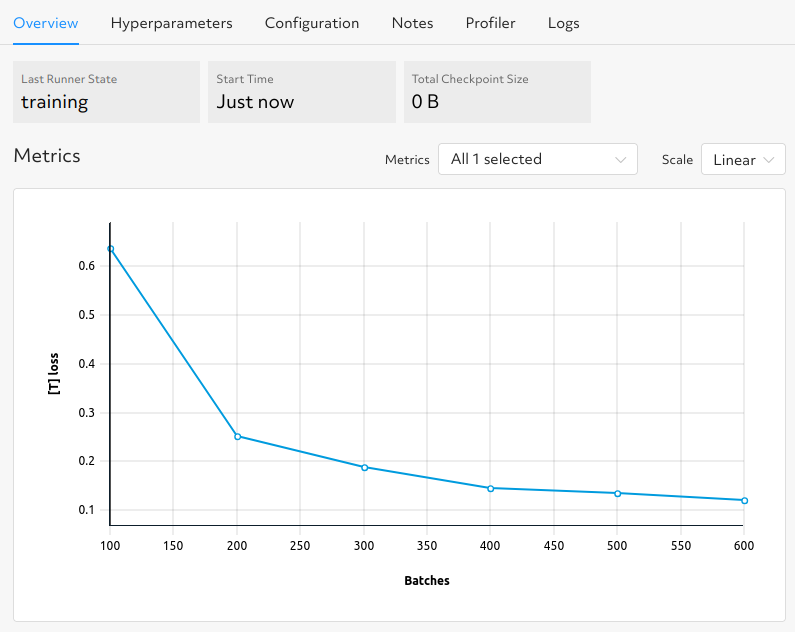
While an experiment is in the ACTIVE, training state, click an experiment tile to see the Metrics graph update with your currently defined metrics. In this example, the graph displays the loss:
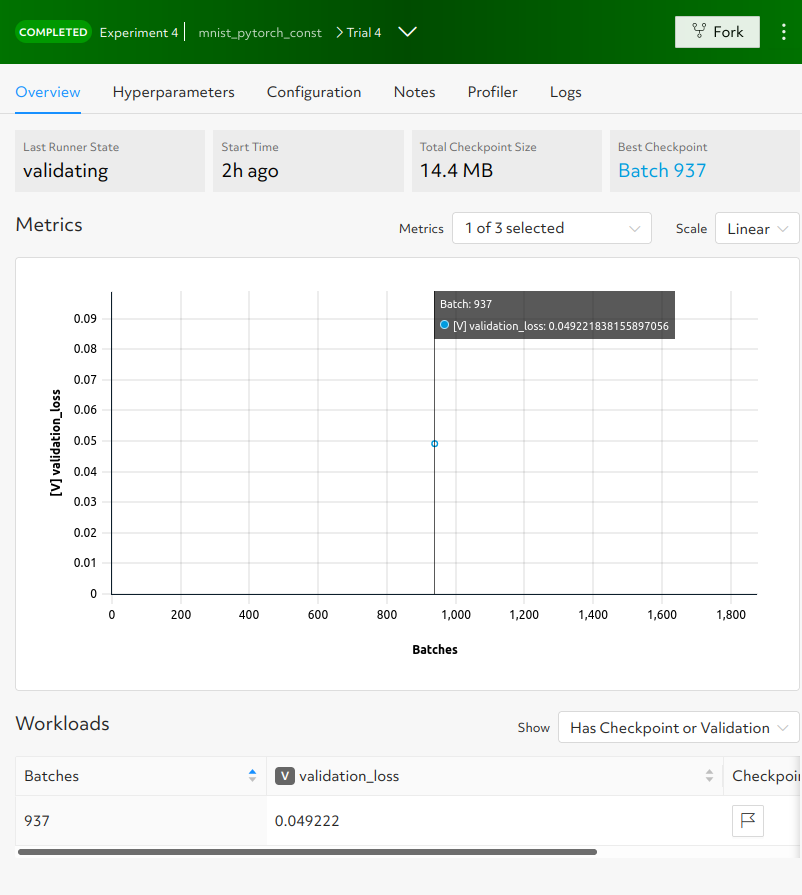
When the experiment completes, click an experiment tile in the WebUI to view the trial page:
You can create additional experiments repeating the det experiment create command as a way to
gain familiarity with other Determined WebUI functions.
Run a Distributed Training Job
This exercise requires a Determined cluster with multiple GPUs.
Determined can coordinate multiple GPUs to train a single trial more quickly by using distributed training. The model used in this example does not fully demonstrate the benefits of distributed training but is still useful in showing how to work with additional hardware resources.
To use distributed training, the resources.slots_per_trial field in the configuration file is
set to the number of GPUs to distribute across. The distributed.yaml file is the same as the
const.yaml file, except that the resources.slots_per_trial field is set to 8. The
default slots_per_trial setting is 1.
For clusters that have multiple GPUs per machine, slots_per_trial must be divisible by the
number of GPUs per machine or the job cannot be scheduled. For example, a 7-GPU job cannot be
scheduled on a 4-GPU per machine cluster, but an 8-GPU job can be scheduled.
Create the experiment using the distributed.yaml file:
det experiment create distributed.yaml .
Enter the cluster address in the browser.
Accept the default determined username with no password and click Sign In to view the WebUI dashboard.
Click the Experiment tile to view the experiment’s trial display.
The loss curve is similar to the single-GPU experiment in the previous exercise but the time to complete the trial is reduced by about half.
Run a Hyperparameter Tuning Job
Hyperparameter searches involve multiple trials or model variations per experiment. This example
demonstrates hyperparameter search using the adaptive.yaml configuration file. The parameter
settings tell the search algorithm the ranges to explore for each hyperparameter. This example model
uses a fixed batch size and searches on dropout size, filters, and learning rate. The searcher name
is set to adaptive_asha and max_trials is set to 16, indicating which search algorithm
to use and how many model configurations to explore.
Submit the experiment specifying the configuration file:
det experiment create adaptive.yaml .
Enter your cluster address in the browser.
Accept the default determined username with no password and click Sign In to view the dashboard.
This can take some time to complete and you can monitor the progress in the WebUI Dashboard. Click the Experiment tile to access the experiment trial display and notice that more trials have started:
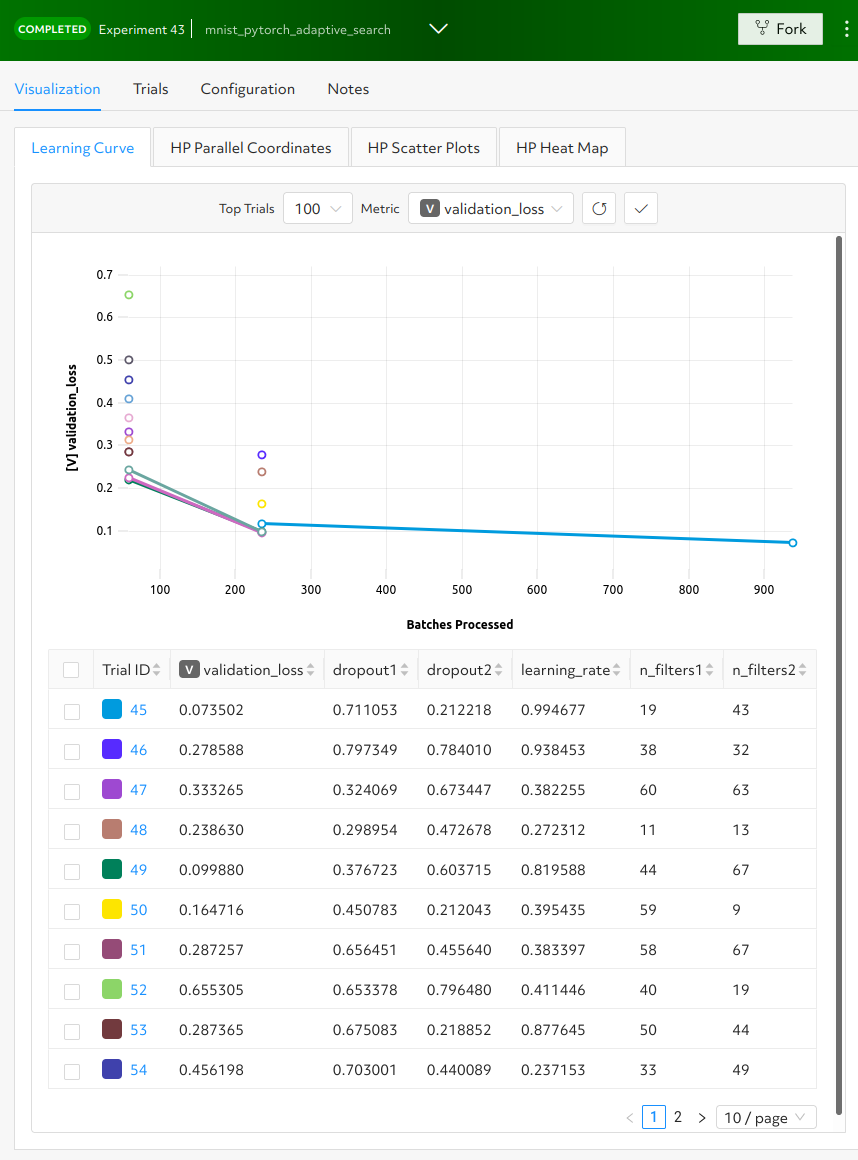
Determined runs the number of
max_trialstrials and automatically starts new trials as resources become available. The hyperparameter search halts poorly performing trials. On a typical laptop, 16 trials should take around 10 minutes to train with at least one trial performing at about 98 percent validation accuracy.
Learn More
For instructions on installing Determined in different environments, see:
Basics for administrator setup tasks.
Deploy on Prem for local setup and deployment tasks.
Deploy on AWS for AWS deployment.
Deploy on GCP for GCP deployment.
Deploy on Kubernetes for installation and running Determined on Kubernetes.
For faster, less structured ways to run a Determined cluster without writing a model, see:
In the Examples section, you can find a list of example machine learning models that have been ported to the Determined APIs. Each example includes a model definition and one or more experiment configuration files, with instructions on how to run the example.
To learn more about the hyperparameter search algorithm, see the Hyperparameter Tuning section.